Contouring is one of those makeup techniques that can seem really scary and difficult. Especially when you see those face charts with a zillion stripes and triangles, but I promise, it’s actually really easy.
When done properly, no one will even know you’ve contoured your face and it should take you less than a minute. I promise!
Foundation creates an excellent base that smoothes out the tones in skin. Contour adds shadow and depth back in to your skin.
If you were painting, think of foundation as the canvas and contour as the shadows. Shadows give a painting life and make it seem real.
Types of Contour Products
Generally, contour products come in two textures: cream, and powder.
Contour products are applied after foundation and concealer, and before bronzer, blush, and finishing powder.
Cream textures tend to blend easily with most skin types and become like a second skin. I love cream contour for everyday makeup, as it’s almost impossible to see or spot on the skin when it’s blended properly.
Contour powders add extra impact and can look amazing in photographs. They can even be layered over a cream contour for extra definition. The powder texture can sometimes be a bit harder to wear on dry or mature skin, but applied lightly, is definitely doable.
Shades
Most contour products will come in a few shades: light, medium, or deep. Finding the right shade for your skin tone is one of the most important parts of contouring!
Choose a contour shade only 1-2 shades deeper than your skin tone. It also should be slightly cooler than your foundation. You want the shade to look like a true shadow.
Related Post | How To Figure Out Your Skin + Under Tones
Where To Contour
The key areas to contour are the center of the cheeks, around the forehead, underneath the chin and jawline, and down the sides of the nose.
Each face is unique. Study the shape of your face and only contour areas that you want to recede.
For example, if you have a smaller forehead or very defined cheeks, you might want to skip contouring those areas. But if you feel like you want to slim your nose or give your jawline more definition, you’ll want to add contour there.
Each person will want to contour different areas of their face. This is a general guide of the most common areas on most people.
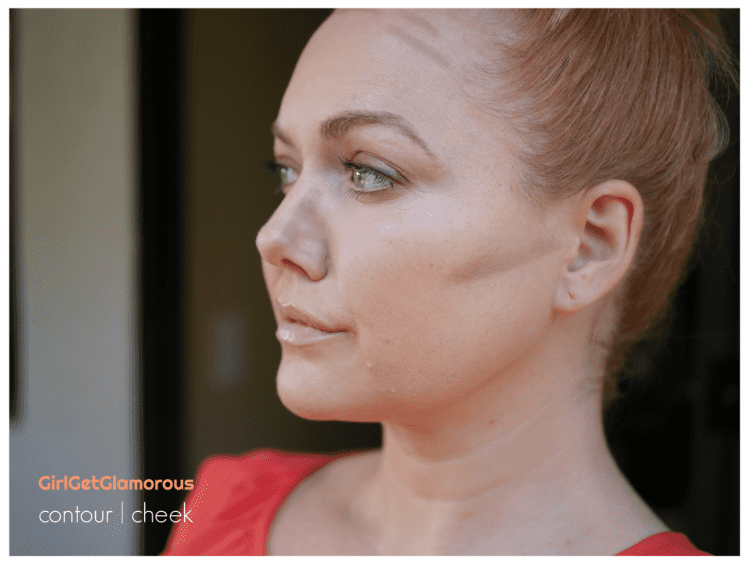
Cheeks |
Cheeks are my personal #1 favorite area to contour. I love how it slims my face.
I draw a thin line from the center of the ear, straight (not down) in the direction of my nose.
I like to stop mid-cheek, about 2.5 inches from my nose, before the apple of my cheek begins.
If you are having trouble figuring out where to stop your line, smile. Stop your line right before your cheek is rounded from smiling.
The reason I draw my line straight, instead of following the hollow of the cheek down, is to lift the look of my face. If you bring your contour down, you’ll end up with a sunken, heavy look. Watch the video below to see more!
I blend the lines upwards as I go. I blend each cream line immediately, as I find it’s easier to blend that way, vs drawing all of them on and then blending. I blend all my makeup products up, as it helps lift the look of my face.
__
__
Forehead |
If you have a larger or more square forehead, you will love contouring here! I used to try and cover my forehead with side swept bangs, but didn’t have to do that after I learned how to contour.
To round a square shape:
At the top outer edges of your forehead, add two rainbow shaped marks, then blend up towards and into your hairline, before blending down.
To resize a larger forehead:
Add another line across the top of the head, again, blending up and into the hairline, then blend down towards your nose. You can add another line below that and blend again for larger foreheads.
In art and drawing terms, to make a forehead proportional to the rest of the face, it should be about the same height as the area from below your nose to your jawline.
If you are new to contouring, don’t hesitate to take out a tape measure and measure your forehead (from top to top of brows) and your bottom of face (from under nose to bottom of chin). For me, my forehead height is 3″ but my nose to jaw is 2.5″. I fill across the top half inch of my forehead to help it recede and even out the proportions of my face.
__

__
Nose |
On your nose, you’ll apply contour down the sides and then out at the bottom, like drawing the letter “L” on your nose.
I never draw a line across or box shape at the bottom of my nose, that will actually make the ball of your nose appear larger.
I use a very light pressure when drawing the initial contour lines out on my nose, as I don’t want too much slimming. My nose is on the smaller side and in proportion to the rest of my face.
If I contour too heavily, it throws the proportions off. But a light application adds definition, which is especially nice in photos. If you have a larger nose, you can go a bit wider and add a second layer to your application to slim the nose.
__

__
Jawline |
The jawline is a great area to contour as we age and the shape of that area changes.
I will draw a line right at the top of the bone. Lightly press your fingers along your jawline to fell this edge.
I like to blend down first, so there isn’t a harsh line between my face and neck, and then upwards to lift to look of my face.
I also draw a few extra lines right under my jaw and slim the excess skin (double chin area) there. I blend down and into my neck, to make it seem like a true shadow.
__

Before + After | Contour Results
__
My Favorite Contour Products |
1 | Fenty Match Stix – shade Amber (Cream) – .25 oz, $25
2 | Jordana Contour Stick – shade 01 (Cream) – .24 oz , $9
3 | Fiona Stiles Sheer Sculpting Palette – shade Light/medium, discontinued (Powder) – .39 oz, $28
4 | Koh Gen Do Contrast Powder – one shade (Powder) – .11 oz, $54
5 | Kevyn Aucoin The Sculpting Powder – shade Light (Powder) – .14 oz, $44
6 | L’oreal Contour Kit – shade Light (powder) – .24 oz $8
7 | Wayne Goss “Airbrush” Contour Powder Brush (use with powder products) – $35 (this is an insanely high quality brush, handmade in Japan, and generally unheard of for cruelty-free blue squirrel bristles at this price point. I own two of these brushes and use them daily both in my personal and professional kit.)
8 | e.l.f. micro contour brush (use with cream and powder products)- $3
9 | Beautyblender pro (use to blend out cream and/or powder products)- $20
__

__
I know contouring can feel really intimidating at first, but it really and truly takes me under a minute to do. You can watch me contour in real time in the video.
Practice definitely makes it easy and quick!
Video |
I hope this post helps. Feel free to leave any comments or questions below, I’d love to hear from you!
__
Shop the post |

__
Similar Posts |
- How To Use a Jade Roller (Guide with Photos)
- The Best Foundations for a Poreless Finish
- Concealer Tutorial | 35+ Mature Skin (see the ZIIP device in action!)
- My Favorite 9 Concealers for Dry + Mature Skin
- How To Hide Dark Under Eye Circles
- The Best Eye Cream (You’ve Never Heard Of + It’s Affordable!)
- My Top Beauty Products of 2018
- My Favorite Six Foundations (at every price!)
- The Best Gentle + Effective Makeup Remover
__
Social Links: Facebook (I use this a lot for flash sale links) | Instagram @girlgetglamorous | Instagram hair extensions @girlgetglamorousHAIR | Pinterest (join over 1.2 million+ other monthly views!) | Join 60,000 + other monthly blog readers and subscribe to the (free!) mailing list to get the latest posts straight to your inbox.
Thank you for reading and being a part of the blog!
The post How to Contour | Beginner + Mature Skin Tutorial appeared first on GirlGetGlamorous.
How to Contour | Beginner + Mature Skin Tutorial sourced from: GirlGetGlamorous
No comments:
Post a Comment